Thursday 25 March 2010

Leather Dying Instructable

This is another instructable, this time for dying leather. For my camera I am having a leather feature across the front and reflect this in the handle and reel by having panels of leather on both of these. The reason that I was trying to dye leather was because the leather I wish to use is a very intense orange and it was becoming apparent that it was going to be difficult and expensive and this seemed to be the easiest way to get the right intensity that I wanted.

I also took a wee trip over to textiles to get some advice on dying leather and they weren't any use. They also told me to use this dye that I is used in this tutorial saying that it's suitable for leather. After investigating this and contacting the dye company, they inform me that they no longer sell this dye and it's not suitable for leather. This means that textiles were no use. But after browsing for a long time online I finally found a seller of the dye and decided to attempt dying the leather with this method.


For this you need:

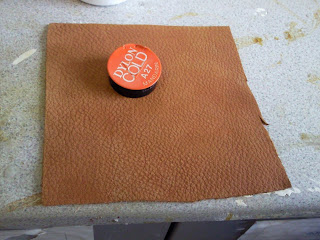
-Dylon Cold Water Dye in a colour of your choice (I used orange!!)
-A sample of leather preferably in white or shades of. (I have used a dark tanned colour leather as this was the lightest colour I had available at the time)
-A small container
-A stick to agitate the leather
-A basin

-125grams table salt

1. Take the deep basin that is big enough to fit your sample of leather in and fill it with cold water.

2. Make sure you have your leather and dye close by. I suggest that you take a piece of wet and dry sandpaper and very lightly sand the shine from the leather. According to the textiles department this helps the dye to stick better to the leather!!

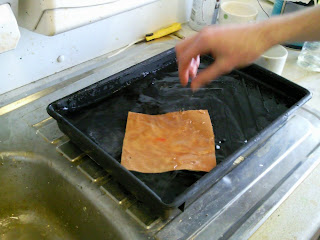
3. Dampen your leather and then place this aside until needed later on.

4. Take your container and place your Dylon Cold Water Dye into it making sure that you pierce the lid of the dye first allowing it to be released.

5. Fill the container with hot water allowing the pot to release the dye.

6. Into the container of dye and hot water add your salt.

7. Agitate the mixture ensuring that the salt to dissolve in the hot water.

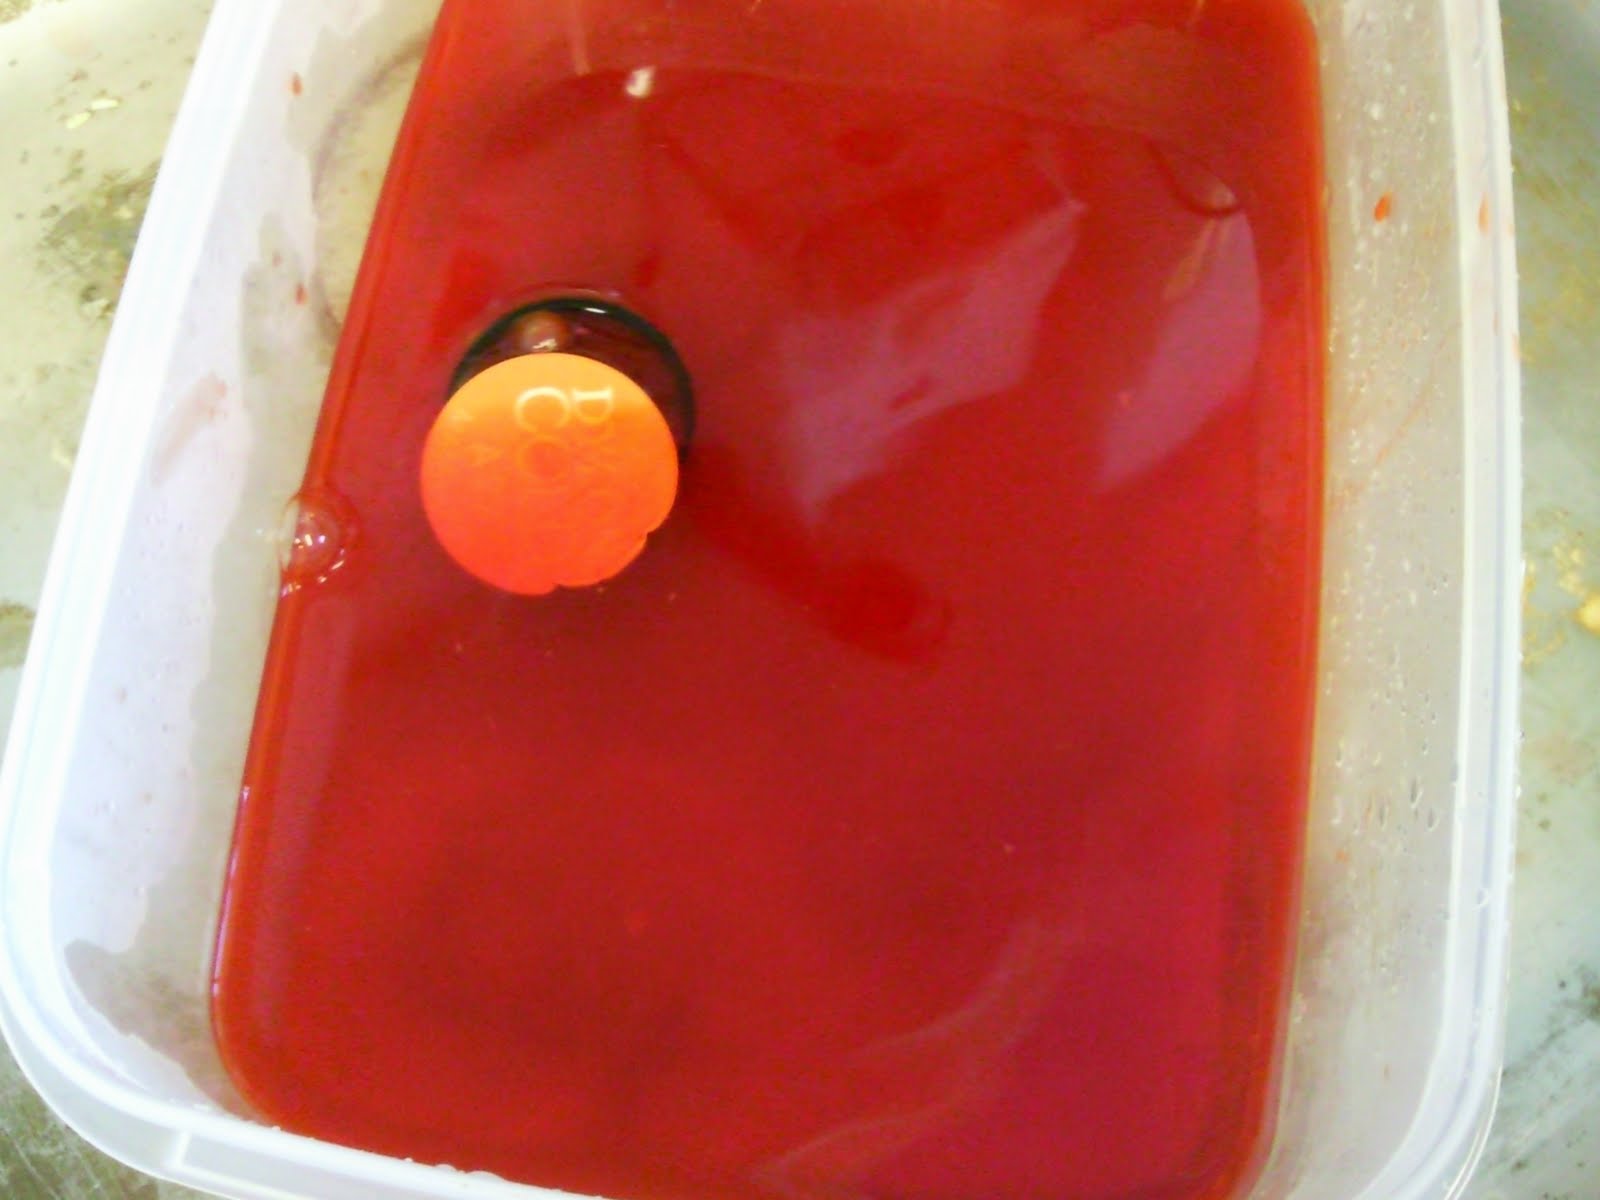
8. When the salt has been dissolved and the most amount of dye has been released they water is ready to be transferred.
9. Remove the leather from the basin of water wringing out as much water as possible.
10. Add the mixture of hot water, dye and salt into the basin of cold water, removing the pot of dye, or placing it to the side.


11. Place your dampened leather into the mixture in the large basin.


12. Agitate the mixture with your stick to make sure the leather is completely covered into the mixture.
13. Because I was dying a dark shade of leather and was wanting an intense colour of orange, I decided to put some of the powder dye from the pot on top of the leather in the basin to try and make it more intense. I had also hoped that the leather would pick up more colour.

14. Leave to soak for one hour.

15. Rinse the leather with cold water until it runs clear.

16. Allow the leather to dry but do not expose it to direct heat which may take up to two days depending on the thickness of the leather.

17. You now have a different colour of leather (will post up my results soon, forgot to take an image showing before and after)

Using The Lathe


^^Marking out the material to be turned on the lathe. The corners had to be marked out and planed off, making it easier to turn the part.

^^The part ready to be turned on the lathe.

^^My first ever attempt at turning on the lathe. It took me a while to get the hang of the process.

^^My second attempt at turning, much easier the second time.

^^The two disks cut from the cylinder that I turned which will act as the ends of my handle.
This week I had been using the lathe for the first time and it wasn't easy to get a hang of. I need to use the lathe to make two disks that are to be used on the end of the hollow cylinder that I have been making.
The first time I used the lathe I was stupid enough to use the tools the wrong way round, which made sense why the material wasn't cutting. After I had worked this out I started cutting away at the material which took a little bit of time to tidy up all the chips in it which I made from using the tool upside down. This is when I decided this would be my practice piece.
When I had eventually got the hang of using the lathe it became a lot easier to use and I then had a cylinder which was of good quality. I then took to speed of the lathe down and put into reverse so that I could use sandpaper on the part to give a smoother finish.
After this practice piece I then went on to the final piece which my two disks were cut from.
An overall positive experience where I have learnt yet another process from making the model myself.

More Progress

^^The piece being turned attached to the lathe.

^^One of the conical shapes turned on the lathe.

^^The smaller conical feature to be used on the camera.

^^The larger conical shape that has been turned and to be used on the reel.

^^The two conical shapes being used, both of varying sizes.
Still in the middle of making my final model and with only a week until the MAKE crit, it's beginning to get a bit stressful. Currently making all the various different components by myself, apart from impossible metal parts which engineering are kindly making for me, it's a very time consuming process. I hope to have all the parts made by the crit and then over the easter holidays take the time in assembling the product and achieving the correct finish.

Tim Brooke:Nokia


Last week we had a visiting designer who is currently working at Nokia. Tim Brooke is an interaction designer/flash developer and has worked with well known companies such as Intel, Microsft, Ideo and The Science Museum.
I really liked this project that he showed, The Wishing Well, which he done for Intel. It was the working prototype that I was really interested and how users interacted with it. Such a nice project too.

"Shown in the demo section of UBICOMP '03 conference, this project looked at how an interface could allow people to express and organise their dreams, desires and wishes in a computer medium."

Check out more of his work at his website: http://www.timbrooke.phpwebhosting.com/

Tavofono

This is a video from Interaction Design Lab which is where visiting designer Stefano Mitri worked/has worked.

I remember seeing this video or idea before but can't remember where or why!!

The Sandpit by Sam O'Hare

The Sandpit from Sam O'Hare on Vimeo.

Tuesday 23 March 2010

Thursday 18 March 2010

Hollow Cylinder Instructable

This is a brief instructable on making a two part hollow cylinder from a waste pipe. I tested this method out for the handle part of my project and was recommended that this technique would produce the same results as turning and milling a piece of material would but in less time. I needed the tube to be hollow so that I can fit electronics inside and so it can be fixed to other parts. I also wanted it to be made in a way that will allow me to take it apart easily if any electronics start to malfunction inside.

So the first step is to acquire a piece of tubing that is similar to your required diameter. I used a 36mm diameter waste tube which was the only part available which was close to the 40mm diameter that I required.

^^ Next is to drill two small holes through one side of the tube which will be fixed to a scrap piece of metal through the use of screws. Make sure the holes are in line with each other.

^^ Then find a FLAT piece of scrap wood which is the same length or longer than your tube. Drill two holes in this which are in the same place as the holes in the tube.

^^ Screw two screws through the holes which you have created making sure that they go no more than half way through the tube. This will cause a problem when cutting the piece in half as it will come in the way of the blade.

^^ You should now have a tube attached to the flat piece of wood. This will make it easier to keep the part steady to pass through the band saw for cutting the tube in half.

^^ Next stage after this is to mark out precisely where the middle of the tube is. Make sure this is marked out clearly along both lengths of the tube and is clearly visible. Then mark the guage on the bandsaw which will allow the wood and tube to pass through the blade slightly to the left of the half way line that you have marked out. This makes sure that the other half of the tube is precisely cut down the middle. The screwed part isn't required, other than for scraps and test pieces. Also cut the tube to the correct length ensuring that you make two of these. It is recommeded to make these a couple of mm larger than the required dimensions.

^^ There will be a lot of residue material on the edges of the tube. Take a sharp scalpel and run this across the edges to remove this.

^^ The edge will be easier to work with when the residue is removed and can be sanded further if neccesery but you don't want to remove too much as this will leave an oval shape when the two halfs are fixed together.


^^ Tape both halfs together so that they can be sanded at the smae time which will allow you to make them the both length without too much effort.

^^ Sand both of ends of the tubes on the circular sander, again remembering not to take too much off as you may go further than your required length.

^^ Using the scrap material from the unwanted half of the tube, cut two strips slightly smaller than the required length of the tube. Sand any rough edges. These parts will act as the lip on one half of the tube to make it easier to join the two halfs together when finished.

^^ Using solvent cement, smear a light layer of this over the strip of tubing and then stick this to the inside of one half of the tube leaving an overhang of about a centimetre. Hold this firmly for 20-30 seconds to ensure that it's going to stick and then place the part into a vice to ensure the two parts want to stay together. Don't tighten the vice too much as this will start to bend the tube and begin to alter the shape and properties of it.

^^ While this is drying, you can begin to prepare the styrene. Due to my part needing a groove on one half of the tubing, the styrene will be fixed over the other half of the tube to make it larger which makes the other half smaller when they are fixed together. The styrene which I used was 1mm thick which brought the overall thickness of the cylinder to 37mm.

If you don't need this groove then this can be skiped, otherwise source the correct size of styrene for your part. Measure out the size of styrene that you will require leaving a hangover of a couple mm. Taking a scribing blade, scribe down the marked area on the styrene with a metal ruler. When this had been done, the styrene can be easilt bend over and will snap across this line.

^^ Using the leftover tubing as a mould, heat the styrene piece gently and it will slowly begin to become flexible.
^^ When the styrene begins to soften place it on top of one half of the scrap tubing.

^^ Then place another half of the scrap tubing on top of the styrene.

^^ Press down firmly as the styrene begins to cool and harden again. This process will allow the styrene to fit nicely around the tubing without having to be forced to stick. Repeat this process until you the shape of the styrene as a semi circle without being held in place.

^^ Using the solvent cement, stick this to the outside on the half of the tubing that you require. This time don't attempt to place the part in the vice, it makes the styrene begin to peel of on one side. Instead press firmly on this as best as possible across the surface of the styrene. You may need to hold tightly for 2-3 minutes just to make sure the two parts are firmly secured.

^^ With the overhang material, take a sharp scalperl or craft knife and trim close to the edge of the tube. Then, working through various grades of sandpaper, sand the edge down as close to the tube as possible so that the edge is uniform.

^^ Repeat this step for the top edges.

More Milling Images

^^ the surface of the inside part of the camera

^^ the machine part and vice clamp used for milling

^^ the handle for moving the milling bed up and down. One full rotation of the handle equals 3mm. I had to shell out the camera in stages of 3mm due to all the shavings getting in the way and to make the cuts as neat as possible.

^^ the handle for moving the milling bed left and right. Was quite confusing trying to remember which way to turn the handle for each direction. Often resulted in small notches being made on the side.

^^ the two final parts shelled out to leave the camera with the correct wall thickness

USB Cable


How the USB cable should look on the final model.