I want the smaller detailing of my product to be perfect including the shutter sound. This will inform the user that the camera is doing something.
I left a post on a photography forum to see what the best camera sounds are and see if this would help me. The majority of the replies were from professionals who take photography very seriously and related to shutter sounds from serious cameras (slrs) and this isn't the type of sound I feel the camera should have. I also looked at some youtube videos which involve shutter sounds of cameras.
One way that I was going to do this was to record a camera shutter sound and then it would play when the user takes a photo but the quality of sound wasn't very good and I wasn't sure what sound to use.
I think the best way to make a sound is to use a click from a button. This mechanical sound is pleasurable and will reduce the amount of technology I need to embed in the handle.
Sunday, 28 February 2010
LaCie by Sam Hecht
 I posted this up a while ago when I was looking at Industrial Facilities product range. I'm looking to use a similar USB feature to what was used in this LaCie product. I want to build the USB cable into the camera to make it more neat and tidy rather than having to supply a cable for the user. It will, hopefully, also provide a nice interaction for the user.
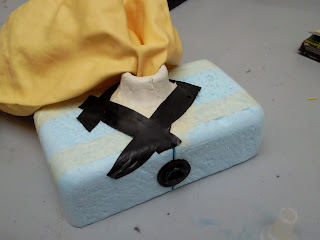
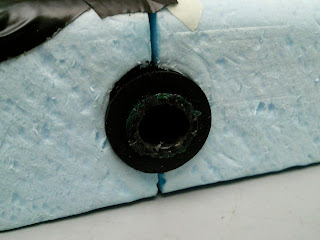
Camera Stopper and Tubing
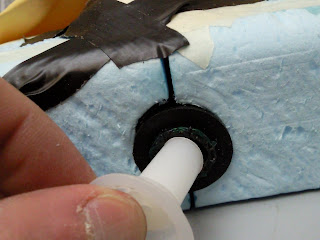
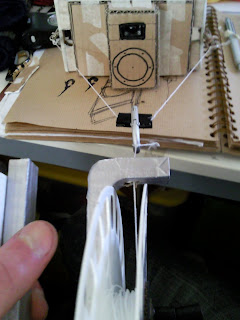
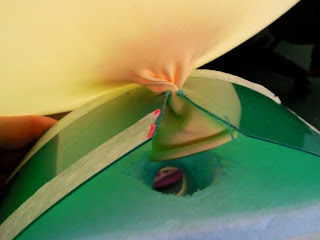
After my tutorials last week it was established that the length of the tubing on the camera was not neccessary and this could simply be a hole. I made another prototype of how this would look and how it works.
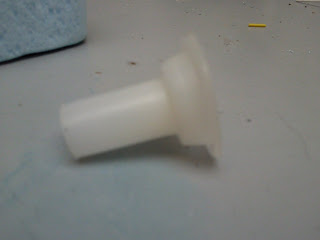
The stopper of the tubing is a balloon valve. This valve will not let air out and keep the helium inside the balloon. I'm still waiting on some more valves being delivered which I hope work in a different way. The ones that I want will allow air in one way but not the other. If I can find these then this can simply be designed into the camera which would remove any difficulty for the user.
I'm not sure whether this could be a simple cork type action or if it should be screwed to reduce the chances of it falling out, this is something that I need to test out.

Twisting Cable
One of the major issues that I had when changing from wireless to using a wire is the twisting of the cable inside the reel. This has been a challange to get my head round and I tried several ways before managing to work something out (in the post below)
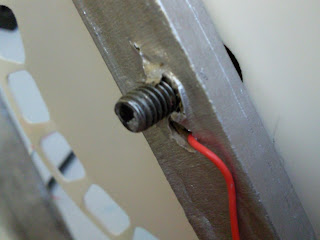

One of the first ways that I thought of resolving this issue was to make a hole next to the bolt where the wire would come out and be lead up to the handle. The reason that the wire could not be simply placed in the middle of the reel is because the bolt needs to be central allowing the reel to spin.
This idea didn't work!
The wire just got stuck around the bolt and the tension in this stopped the reel from spinning.
Back to the drawing board I thought about making a figue 8 reel where one reel would wind while the other would unwind resolving the issue of the cable tangling around the bolt.

This also didn't work!
The reel didn't move at all but in my head it did. If I did some research on this type of reel winding technique it might of worked but I discarded it.
After this I gave up and had a long think about how it needs to work and tried to get my head around it. While doing this I discovered another problem that I had was that I actually need two wires to wind up because of the earth and live connections on the switch. This then made it really more difficult for me to get my head around how to make the wire not tangle inside the reel.

Finally I was getting somewhere after I looked back at knot tying processes that I had used previously. Researching up on this I also looked at how fishing rods work and youtube videos that people have made relating to untangling the wire. This was when I came across an idea that would work in theory and hopefully in reality if the dimensions are correct.
This can be seen in the post below.
Saturday, 27 February 2010
Engineering

I need to get this part made in engineering so I made some solidworks renders and drawings. It looks very complicated so I hope they don't have any difficulties in making it.
When assembled, the part should, hopefully if my dimensions are correct, will prevent the wires from twisting inside the reel.
The drawings are in engineering at the moment so hopefully I will have this back by next week and will be able to test it.


20 metres of Cable
 Reflecting on my project and the wireless aspect of it, it has occured that many problems could be solved if I don't use the wireless transmitter and reciever. Instead using wire which will come down from the camera to the button in the handle.
It will solve the issue of having two on/off switches, two sets of batteries, casing the batteries and circuit boards in both the camera and the handle. It will also mean I don't have to fit alot of electronics into the camera casing.
Instead, it was decided that a length of 20 metre wire would be sufficient for the product and this would be as high as the camera can reach. The reason for not allowing it to go any higher is because the detail in the pictures would disappear and people would be unrecognisable. For the situations and environment that the camera will be used in then this is appropriate.
Because the switch has a positive and a ground wire, two cables are required to come down from the camera to the handle. My initial thought is to use ribbon cable with two wires. Although, not sure if this is the right thing to use I prototyped it anyway.
 ^^how the cable would look on the reel
 ^^a push to make switch on the end of ribbon cable (used as a first quick prototype before my 2 wire ribbon cable arrived)
Saturday, 20 February 2010
Reel Design Development


 More 3D SolidWork renders but this time for the reel. I was trying to match the colours and materials with that of the camera and also take aspects of the form and incorporate it into this. Still need to decide on materials, textures and which parts should be coloured.
Thursday, 18 February 2010
Solidwork Renders


Some 3D renders that I done today in SolidWorks. It allowed me to experiment quickly with materials and colour. These are the areas that I now need to resolve.
Wednesday, 17 February 2010
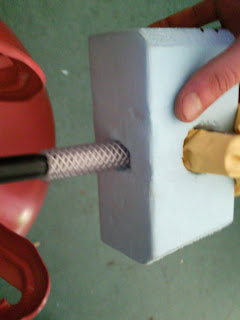
Further Camera Form Development
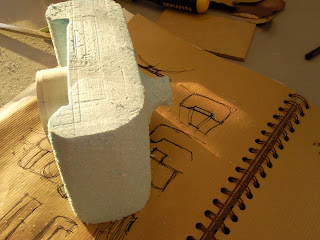
Today I was trying to develop the form of the camera, while incorporating the tubing idea. I had a visual in my head but haven't managed to put this on paper or make it out of blue foam, it just isn't right. Here's what I did manage to do though, just some more blue foam (yet again) models of what I was trying to make. I need to try and make the tubing into more of a feature without looking like it's place randomly on the camera and incorporate the shape of the camera to reflect the tubing features.
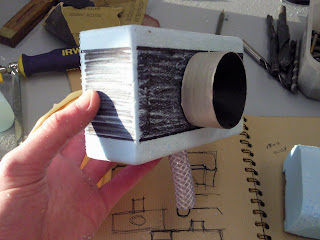 ^^square shape camera
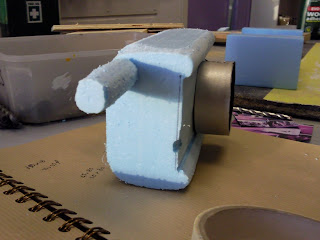
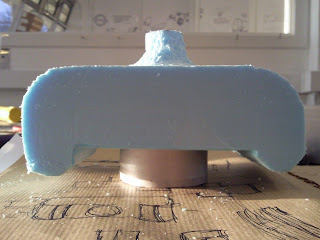 ^^spool idea
 ^^tubing feature at the back
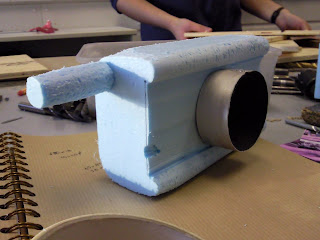 ^^tubing feature at the side
 ^^square shape camera
 ^^spool idea
 ^^tubing feature at the back
 ^^tubing feature at the side
Tuesday, 16 February 2010
Double Clips
Last week after my crit, I was told that I ideally require two clips on my camera connecting it to the reel. It looked tacky and unprofessional the way I had done it before, so today I attempted to work out how these two clips would work. I didn't want to make it too complicated and messy so heres what I came up with.
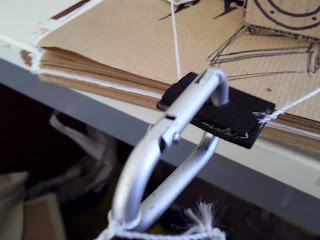
I also tested it with clear fishing wire to see how this would affect the photos. This doesn't have the same tension that thread or rope has but is almost completely unnoticable in an image.


I also tested it with clear fishing wire to see how this would affect the photos. This doesn't have the same tension that thread or rope has but is almost completely unnoticable in an image.


Today: Development of Camera
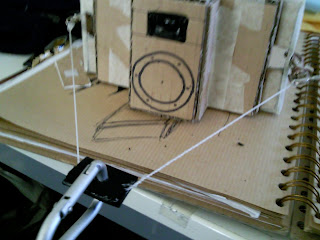
Today I have been developing the camera interaction and how this attaches to the balloon. This has been a big issue with the project and something I have found difficult to get my head around. Pete has been telling me throughout that I should see the camera and balloon as one but I always managed to dicard this information to the back of my head.
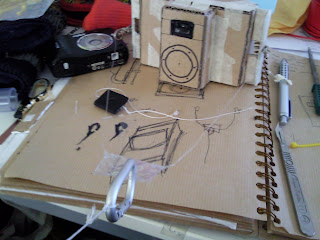
 But finally I took his advice and have been prototyping a tubing method to make the process of inflating balloon and fixing to the camera so much simpler for the user. Here's a couple of images which will hopefully get this idea across.
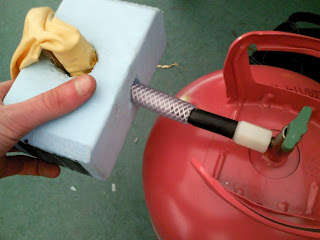 The balloon is permanently attached inside the camera and connected to a piece of tubing. This tubing then comes out another end of the camera and can then be fixed to a helium canister for inflation. This was just a quick prototype, I need to work on the angles of the tube inside the camera .
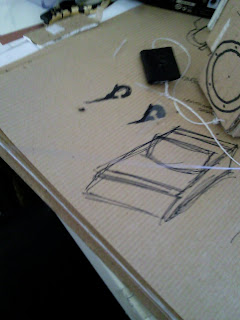
 This was another idea that I discarded a while ago because I personally thought that the process would be too fiddly. This isn't as big a problem as I thought so i made a quick prototype but will make another one including the new and improved form of the camera. It takes the idea of a balloon cup and incorporates this into the form of the camera.

 But finally I took his advice and have been prototyping a tubing method to make the process of inflating balloon and fixing to the camera so much simpler for the user. Here's a couple of images which will hopefully get this idea across.
 The balloon is permanently attached inside the camera and connected to a piece of tubing. This tubing then comes out another end of the camera and can then be fixed to a helium canister for inflation. This was just a quick prototype, I need to work on the angles of the tube inside the camera .
 This was another idea that I discarded a while ago because I personally thought that the process would be too fiddly. This isn't as big a problem as I thought so i made a quick prototype but will make another one including the new and improved form of the camera. It takes the idea of a balloon cup and incorporates this into the form of the camera.

Detail and Context Workshop
Product Functionality: what is the primary funtion of your product? what other functions does it have? what else can it do? what is your rationale?
-to take photos
-to create fun
-a new experience
-light enough to float
-robust
-soft to grip
-memory to store photos
Percieved Affordances: are the designed properties of an object that suggest how it could be used.
-len, what it is
-reel, circular shape to reference motion
-direction of buttons
-grip, where to hold
-direction of reel,anti/clockwise
Identifiers: these suggest to users what something is and the category it belongs to. Identifiers often refer to Archetypes, but can help us to distinguish between subordinate categories.
Form: circular although pictures are rectangular, handles are not consistent//boxy, cuboid, circular lens.
Colour: black areas show interactions, need to indicate points of contacts (grip pads)
Material: leather indicating retro/vintage cameras, plastic=modern, metal=stability.
Environment of use: outdoors, leather could convey adventure
Style: retro modern
Character Traits: a combination of traits defines the character of a product. They are usually expressed by adjectives. Semantic dimensions can help us to describe the character of artefacts.
masculine//fun//playful//lightweight//dull//modern//durable
Intrinsic Motivators: these are features that are pleasurable to use and provide enjoyment, they are often playful. they invite users to attend to, observe, touch, listen to, play with them.
on/off button//reeling in and out (possible noise)//shutter button//balloon itself
Distinguishers: these are product features which have been designed to be distinct in order to clarify, or dictate, how to use a product.
Use of colour to indicate points of interaction//material and texture to show areas of contact and grip
Expressives: These are material qualities expressed by an object in order to clarify, or dictate, how to use a product.
Leather indicating grip//plastic showing lightweight//balloon is attention seeking and has a feel good vibe//weatherproof//robust//sturdy//clinical//playful//cheap:expensive??
Pointers: these are features that direct attention to something other than themselves (e.g. switches and controls) and could include icons, pictograms, symbols, etc.
lens(?), reel indicates to camera and balloon. switch in hand makes the user look at the camera
Metaphor: a metaphor is when one aspect of a product borrows a meaning that you would normally attribute to something else.
film reel to indicate motion and winding//reel styled to look like viewmaster card//button referenced to viewmaster click interaction//string references to kites//form related to retro and vintage camera style//low quality of image relates to lomo movement and creative photography.
Instructions: these are generally verbal features that describe, how to use a product.
how to set up the camera//how to inflate the balloon and attach to the camera//reel directions//button to take photos.
Monday, 15 February 2010
Design Detailing
AFter the workshop today with Pete, I have managed to identify which parts of detailing that I need to work on.
Percieved Affordances
-finer detailing with the direction of buttons and how these should be used.
-orientation of the camera to indicate which way this should be used.
Identifiers
-materiality aspects and qualities to indicate an outdoor product and lightweight design.
-what colours should be used, where and why.
Character Traits
-colourful: indicates playfulness/fun/lightweight/and interesting to use product.
Intrinsic Motivators
-making interactions more fun and obvious to use.
-make the product look inviting for users to play and interact with.
Instructions
-how to use the product as a whole.
-The set up process and how to dissassemble.
Pointers
-user interaction of shutter feedback.
WorldView

"Dimensions: W980 x D980 x H5000 max Materials: 91 LED Cluster lamp, helium balloon, nylon net, spun aluminium, aluminium tube, polyurethane rubber, electrical cable, transformer World View is a virtually weightless lighting fixture. Constructed from a cluster of 91 LEDs suspended from a silver helium balloon and anchored by a spool at floor level, World View proves the simplest, most humble materials can reach great heights. Designed with public spaces, special events and fairs / exhibitions in mind, World View is currently being developed for mass production by London based lighting manufacturer Innermost and will be available for distribution early next year. A limited edition version can be viewed at the Gallery space of sketch, London from October 2003."
Really like the arrangement of this piece.
Where does Helium come from and why is is so expensive?
"Helium is a non-flammable, non-toxic, non-radioactive, naturally occurring and environmentally friendly gas that, after hydrogen, is the second most abundant element in the Universe. However, on Earth, helium is relatively rare. In the USA it is mined, or more precisely, drilled for in the Texas and Oklahoma panhandles from natural gas wells that also happen to be encased in radioactive rock. The rocks decay over millions and millions of years and, in the course of that decay, release a non-radioactive by-product --- Helium --- one molecule at a time! The helium gas accumulates in the same pocket that produces the natural gas. Both are recovered together and then later separated.
Right now, the world is gripped in a global helium shortage. Unfortunately, if it’s not extracted during the natural gas refining process, the helium it contains is simply lost. And because it is produced as a by-product of natural gas processing, its value is considerably less. So, extracting it from the natural gas stream is therefore a secondary consideration. Or, to put it another way, right now, helium isn’t valuable enough to those making billions from natural gas extraction to justify developing a natural gas field and then also building a helium gas processing plant purely to extract helium from that natural gas stream. The helium distillation plant would be an add on.
Following World War I, up to 32 billion cubic feet of helium gas were bunkered underground by the US government at the Cliffside Field near Amarillo, Texas, called the ‘Federal Helium Reserve’. This stockpile was set up to be privatized after the Helium Privatization Act of 1996 was passed. This helium is now being sold off at a constant rate (2.2 billion feet per year) with the intent of fully depleting the Federal Reserve (except for a permanent strategic reserve of 600 million cubic feet) by 2015.
The US Bureau of Land Management pipeline and the associated private crude Helium plants handling this strategic resource were all designed to produce 4 billion cubic feet per year of crude helium to supply the 6 private helium refineries located along this pipeline system. However, due to the continuing depletion of current helium-bearing natural gas fields, these refineries can no longer operate at full capacity. Increasing demand (along with a fixed rate of its removal from the Federal Reserve) plus depletion of these helium-gas-bearing natural gas fields have all conspired to reduce the available supply of helium in the United States by approximately 300 million cubic feet in 2007. And that gap is expected to continue growing each year as demand continues to rise and non-strategic reserve sources continue to be depleted.
And while there is an abundance of helium-bearing natural gas in the Middle East, none of these sources are expected to reach full capacity until at least 2011, all of which means that...at least for the foreseeable future...helium to fill balloons will continue to be scarce...and, therefore, ever-more expensive!"
Untitled: André Avelãs
 "André Avelãs's show at IBID PROJECTS. Three huge weather balloons fill the gallery. Printed on them is the phrase, “HIGHLY FLAMMABLE.” It’s fun to work my way through the gallery as they bump into one another. The sound of their inflation drones on as the balloons are fitted with discreet wind instruments. I initially thought it was the result of air pumps, but find a melodica hooked up to a balloon. Still, I see the work as far more sculptural than sonic. Bumping into balloons creates an amusing exploration of navigating an altered space, but the sound? Just a mere side note." (akimbo.ca)
How Radio Control Works
Because the wireless range of my camera is currently 1metre, I need to look into how I can make this distance larger so I looked at how radio control cars work. This is due to me hacking an rc car to make my camera wireless. I will also need to explore radio signals and what kind of circuits are available to make a larger wireless range.
http://tinyurl.com/ygyjskg
http://tinyurl.com/ygyjskg
'WeBlimp'
 "Conceived by senior undergraduate students Andrew Thong, Anna Wu, Brian Quan and Nathan Waddington, from the School of Interactive Arts and Technology at SFU’s Surrey campus, the WeBlimp is a meter-long flying, crowd-controlled blimp. Inspired by the The Eye of Kilrogg, a free-flying entity in the popular on-line game World of Warcraft, the helium-filled aircraft reacts to public response. Supplied with a tiny camera, a gondola and three small propellers, it will show itself at the Surrey 2010 Celebration site in Holland Park during 2010 Winter Olympic Games from Feb. 17-21.
People observing the blimp on a screen that projects what the blimp’s camera sees could guide the blimp to move in a certain direction. Message sent to the blimp via a laptop wirelessly gives directions to the blimp. Therefore, the entire system bases itself on mutual instruction and social interaction.
Already accepted and recognized at the ACM Creativity & Cognition Conference at the University of California-Berkeley last October, the Zeppelin-like craft now readies itself to welcome visitors from around the world."
Saturday, 13 February 2010
 A selection of quick sketches of the form for the front of the camera.
Friday, 12 February 2010

Subscribe to:
Posts (Atom)